

Deploying Kubernetes in the cloud (AWS, GCP, or Azure) spoils us. If you need to expose a web service to the outside world, you simply set type: LoadBalancer on your Service manifest, and a highly available, cloud-managed load balancer appears automatically.
On bare-metal or in a homelab environment, this convenience disappears. Without a cloud controller to hook into, services configured as type: LoadBalancer will sit indefinitely in a <pending> state.
To bridge this gap and achieve a production-grade ingress layer on-prem, we need a reliable bare-metal network stack. In this article, we’ll build this exact foundation using:
- MetalLB to dynamically assign real IP addresses from our local subnet.
- Traefik Ingress Controller to handle incoming application routing.
- cert-manager combined with Cloudflare DNS-01 to handle wildcard TLS termination, even for private domain spaces.
- Advanced Homelab Tricks such as IP address sharing (to conserve IPs) and routing to out-of-cluster bare-metal servers (like Proxmox VE) through Traefik.
Architecture Flow
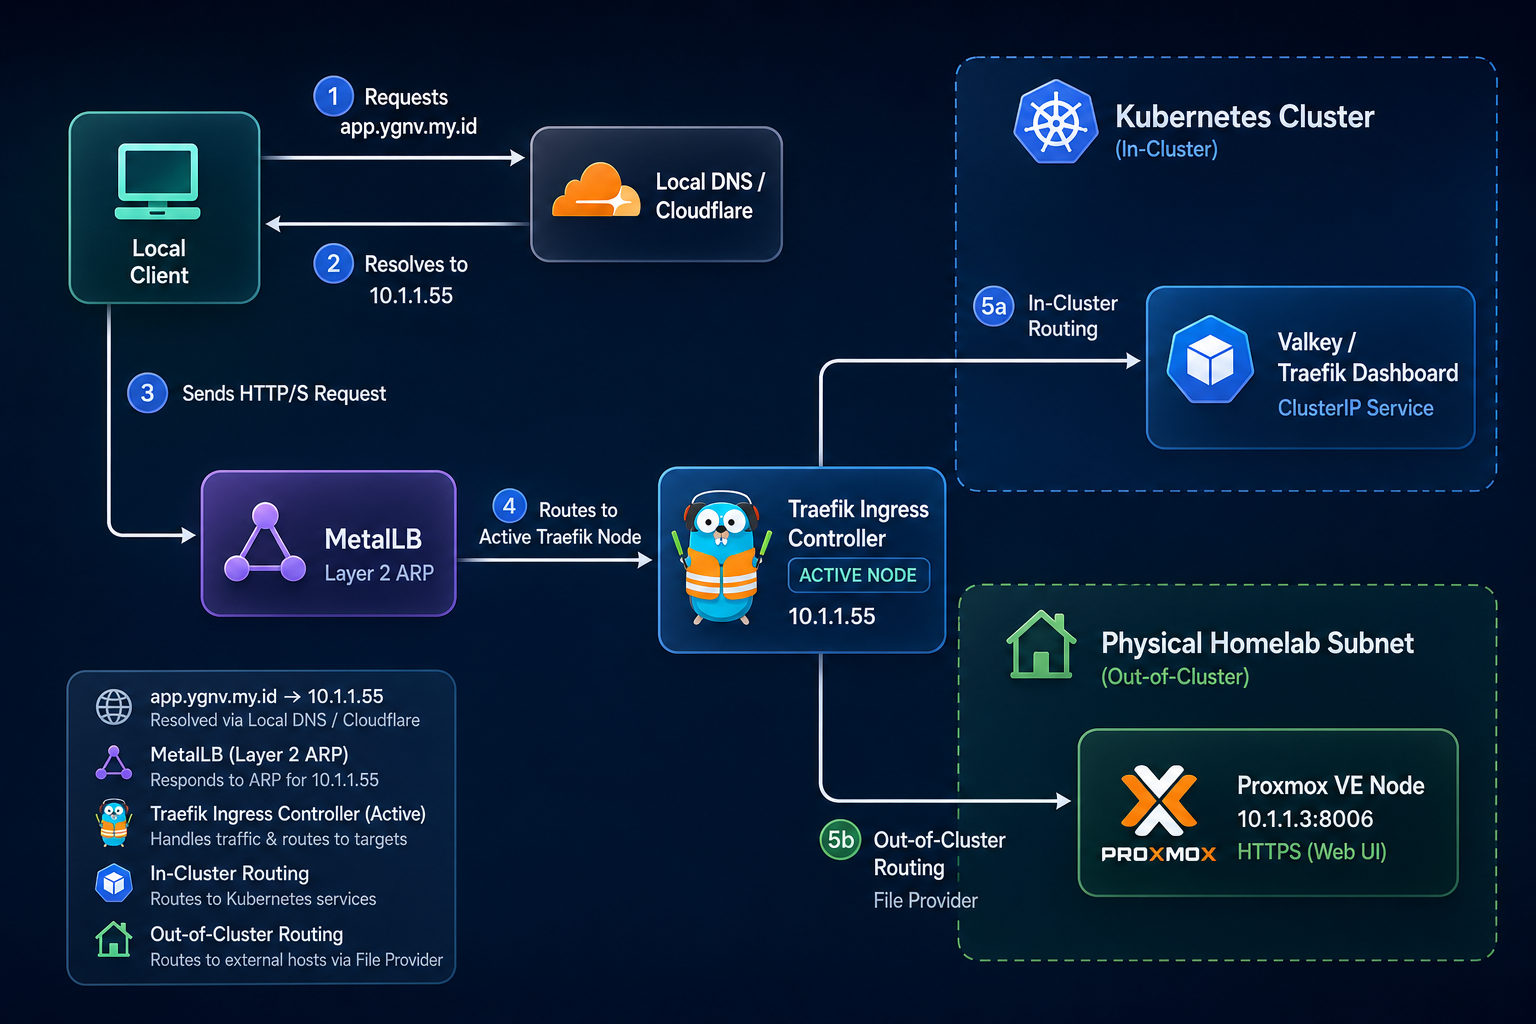
Before diving into YAML, let’s visualize how traffic flows from a client on your local network to an application inside (or even outside!) your bare-metal Kubernetes cluster:
Step 1: MetalLB – Simulating the Cloud Load Balancer
MetalLB acts as the network load-balancer controller for clusters that don't run on a cloud provider. It operates in two modes: Layer 2 (ARP/NDP) or BGP. For standard homelabs and enterprise subnets where you don't control the upstream routers, Layer 2 mode is the absolute go-to.
Under Layer 2 mode, MetalLB designates one of your Kubernetes nodes to attract all traffic for a given service IP. It does this by responding to standard ARP requests on your local network, mapping the service IP to the physical MAC address of that specific node.
The Deployment
We use Kustomize to pull the upstream MetalLB manifests and overlay our custom network range. Here is our exact kustomization.yml:
apiVersion: kustomize.config.k8s.io/v1beta1
kind: Kustomization

resources:
  - https://raw.githubusercontent.com/metallb/metallb/v0.15.3/config/manifests/metallb-native.yaml
  - metallb-config.yml
namespace: metallb-system
The Address Pool Configuration
Next, we define our local address space inside our exact metallb-config.yml. It’s split into two custom resources: IPAddressPool and L2Advertisement.
apiVersion: metallb.io/v1beta1
kind: IPAddressPool
metadata:
  name: main-pool
  namespace: metallb-system
spec:
  addresses:
  - 10.1.1.52-10.1.1.59
  autoAssign: false
  avoidBuggyIPs: true

---
apiVersion: metallb.io/v1beta1
kind: L2Advertisement
metadata:
  name: l2-advert
  namespace: metallb-system
spec:
  ipAddressPools:
  - main-pool
[!IMPORTANT] Homelab Best Practice:autoAssign: falseBy settingautoAssign: false, we prevent MetalLB from handing out random IPs to newly deployed Services. Any service that wants a load balancer IP must explicitly request ourmain-poolvia annotations or request a dedicated IP. This keeps your subnet clean and prevents ip-address exhaustion.
Step 2: Traefik – The Intelligent Edge Router
With MetalLB ready to route local subnet IPs into the cluster, we need an entry point that can read incoming HTTP host headers, terminate SSL, and proxy requests to the correct Pods. Traefik is a modern, fast, and feature-rich edge router perfectly suited for this job.
Let’s deploy Traefik using our exact traefik.yml manifest and expose it as a LoadBalancer service tied to our MetalLB pool.
apiVersion: apps/v1
kind: Deployment
metadata:
  name: traefik
  namespace: traefik
  annotations:
    reloader.stakater.com/auto: "true"
spec:
  replicas: 3
  selector:
    matchLabels:
      app: traefik
  template:
    metadata:
      labels:
        app: traefik
    spec:
      serviceAccountName: traefik
      affinity:
        podAntiAffinity:
          requiredDuringSchedulingIgnoredDuringExecution:
            - labelSelector:
                matchExpressions:
                  - key: app
                    operator: In
                    values: [traefik]
              topologyKey: kubernetes.io/hostname
      containers:
        - name: traefik
          image: traefik:v3.7.1
          args:
            - --configfile=/etc/traefik/traefik.yaml
            - --providers.kubernetescrd.leaderelection=true
          ports:
            - name: http
              containerPort: 80
            - name: https
              containerPort: 443
            - name: dashboard
              containerPort: 8080
          volumeMounts:
            - name: config
              mountPath: /etc/traefik
      volumes:
        - name: config
          configMap:
            name: traefik-config
To route external traffic to this Deployment, we define a Service of type: LoadBalancer. This is where MetalLB works its magic:
apiVersion: v1
kind: Service
metadata:
  name: traefik
  namespace: traefik
  annotations:
    metallb.io/address-pool: "main-pool"
    metallb.io/allow-shared-ip: "traefik"
spec:
  type: LoadBalancer
  loadBalancerIP: 10.1.1.55
  selector:
    app: traefik
  ports:
    - name: http
      port: 80
      targetPort: http
    - name: https
      port: 443
      targetPort: https
    - name: dashboard
      port: 8080
      targetPort: dashboard
Notice how we explicitly requested loadBalancerIP: 10.1.1.55. Thanks to MetalLB, any request on our physical LAN addressed to 10.1.1.55 is immediately routed to our active Traefik Ingress pods!
Advanced Spotlight: IP Address Sharing
In on-prem environments, IP addresses are often scarce. If we deployed another load balancer service (like a database or caching layer), MetalLB would normally require us to assign a brand new IP address (e.g., 10.1.1.56).
However, MetalLB supports IP Address Sharing. By annotating our services with a matching metallb.io/allow-shared-ip key, multiple services can share the same IP address, provided they don't share the same TCP/UDP ports.
Let’s look at how we deploy a cluster-cached database like Valkey (Redis alternative) on the exact same IP address as our Ingress Controller using our exact valkey.yml manifest:
apiVersion: v1
kind: Service
metadata:
  name: traefik-valkey
  namespace: traefik
  annotations:
    metallb.io/address-pool: "main-pool"
    metallb.io/allow-shared-ip: "traefik"
spec:
  type: LoadBalancer
  loadBalancerIP: 10.1.1.55
  selector:
    app: valkey
  ports:
    - protocol: TCP
      port: 6379
      targetPort: 6379
Both Traefik (listening on 80/443) and Valkey (listening on 6379) now happily live on 10.1.1.55! This is an incredibly elegant way to optimize local resources.

kubectl get svc -n traefik demonstrating both traefik and traefik-valkey successfully allocated to 10.1.1.55 on different ports.Step 3: cert-manager & Wildcard SSL via Cloudflare DNS-01
To run secure services (https), we need valid SSL certificates. But what if our services live on a private IP address (10.1.1.55) that isn't accessible from the public internet?
If we tried to use the standard ACME HTTP-01 challenge, Let's Encrypt would try to verify our domain ownership by hitting our server over port 80. Since we are on a private intranet, this verification would fail.
The solution is the DNS-01 Challenge. By writing a temporary TXT record to our DNS provider (Cloudflare), Let's Encrypt can verify our ownership completely out-of-band, allowing us to obtain valid wildcard SSL certificates (*.ygnv.my.id) for completely private hosts.
1. The ClusterIssuer
First, we configure cert-manager with our exact cluster-issuer.yml manifest pointing to Cloudflare's API:
apiVersion: cert-manager.io/v1
kind: ClusterIssuer
metadata:
  name: cloudflare-issuer
spec:
  acme:
    email: [email protected]
    server: https://acme-v02.api.letsencrypt.org/directory
    privateKeySecretRef:
      name: cloudflare-issuer-account-key
    solvers:
    - dns01:
        cloudflare:
          apiTokenSecretRef:
            name: cloudflare-api-token-secret
            key: api-token
2. The Wildcard Certificate
With the issuer established, we request a wildcard certificate that will automatically renew every 90 days using our exact certificate.yml manifest:
apiVersion: cert-manager.io/v1
kind: Certificate
metadata:
  name: ygnv-wildcard-cert
  namespace: traefik
spec:
  secretName: ygnv-wildcard-cert
  issuerRef:
    name: cloudflare-issuer
    kind: ClusterIssuer
  commonName: "*.ygnv.my.id"
  dnsNames:
  - "ygnv.my.id"
  - "*.ygnv.my.id"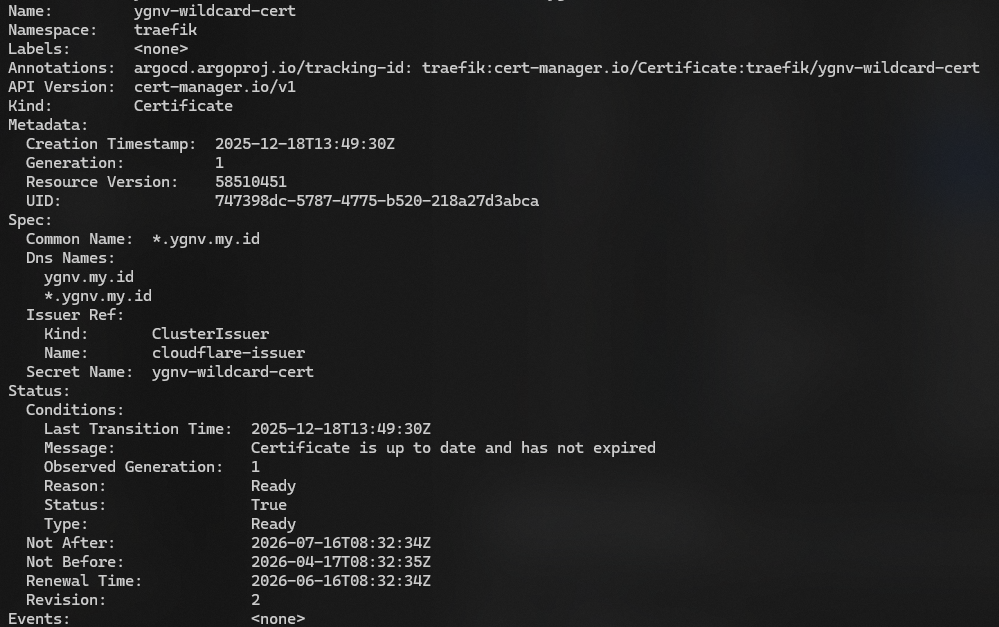
Step 4: Streamlining TLS with Traefik TLSStore
Normally, to secure an IngressRoute in Traefik, you have to define the target TLS secret on every single resource:
tls:
  secretName: ygnv-wildcard-cert
This is repetitive and error-prone. Thankfully, Traefik provides a Custom Resource Definition (CRD) called TLSStore. By defining a default TLSStore using our exact tls-store.yml manifest, we tell Traefik: "If a router requests TLS but doesn't specify a secret name, automatically serve this wildcard certificate."
apiVersion: traefik.io/v1alpha1
kind: TLSStore
metadata:
  name: default
  namespace: traefik
spec:
  defaultCertificate:
    secretName: ygnv-wildcard-cert
Now, we can expose cluster tools like the Traefik Dashboard with a dead-simple, clean manifest using our exact ingress.yml:
apiVersion: traefik.io/v1alpha1
kind: IngressRoute
metadata:
  name: traefik-dashboard
  namespace: traefik
spec:
  entryPoints:
    - https
  routes:
    - match: Host(`traefik.ygnv.my.id`)
      kind: Rule
      services:
        - name: api@internal
          kind: TraefikService
  tls: {} # Automatically uses ygnv-wildcard-cert from TLSStore!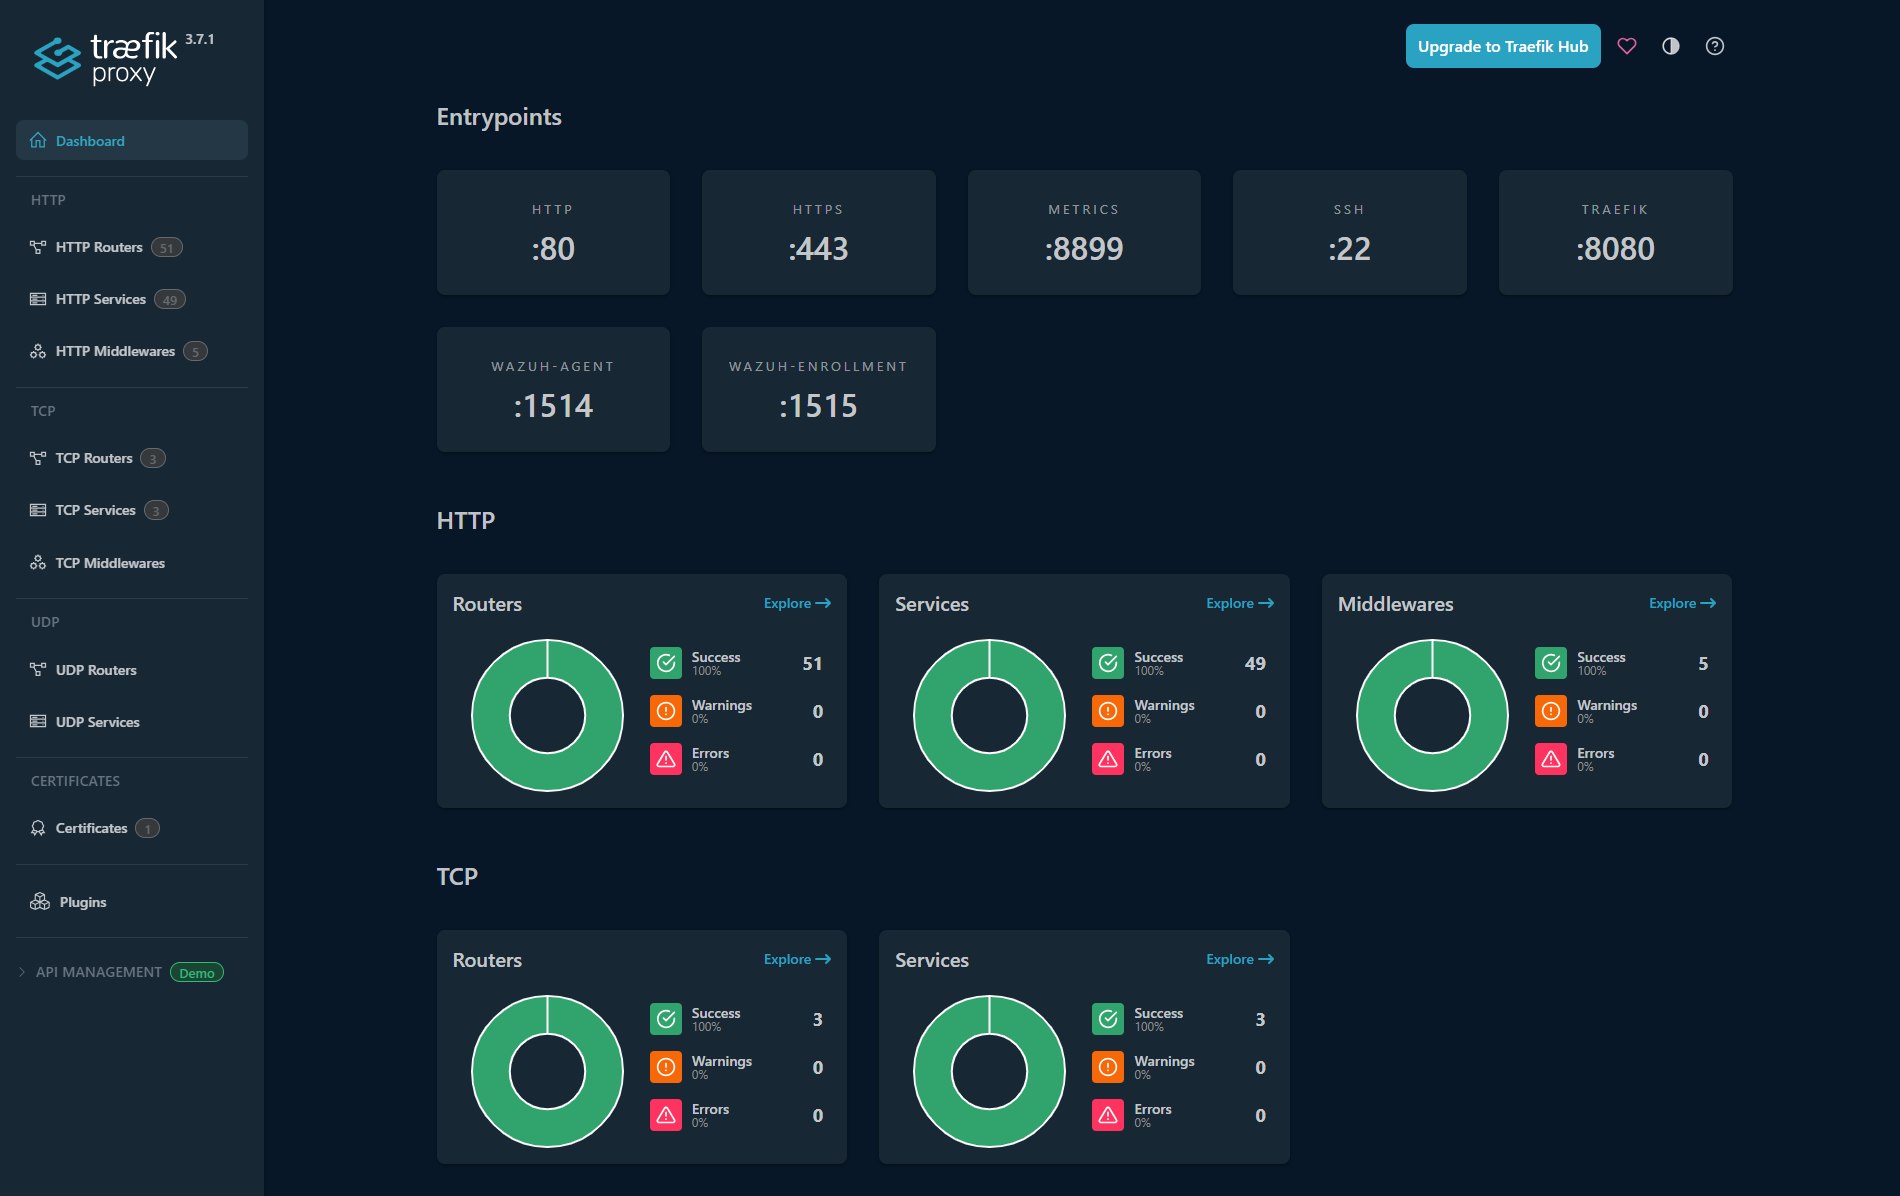
Bonus: Routing to External Hardware (Proxmox VE)
A true homelab is rarely confined only to a Kubernetes cluster. You likely have physical servers, NAS units, or hypervisors like Proxmox VE running outside your cluster nodes.
Would it not be amazing if Traefik could act as a secure gateway for these external nodes as well, terminating TLS and applying custom security headers?
We can achieve this using Traefik’s File Provider. We mount a local config map containing our external router configuration directly into our Traefik pods using our exact config.yml manifest:
# Mount path /etc/traefik/proxmox.yml
http:
  routers:
    proxmox:
      rule: Host(`proxmox.ygnv.my.id`)
      service: proxmox
      entryPoints:
        - https
      middlewares:
        - default-headers
      tls: {} # Wildcard certificate served automatically!

  middlewares:
    default-headers:
      headers:
        frameDeny: true
        sslRedirect: true
        browserXssFilter: true
        contentTypeNosniff: true
        forceSTSHeader: true
        stsSeconds: 15552000
        customFrameOptionsValue: SAMEORIGIN

  services:
    proxmox:
      loadBalancer:
        servers:
          - url: "https://10.1.1.3:8006" # Real physical Proxmox node
        passHostHeader: true
With this setup:
- Any HTTP request to
proxmox.ygnv.my.idis intercepted by your local DNS, resolving to10.1.1.55. - Traefik intercepts the request, terminates TLS with your valid Let's Encrypt wildcard certificate, and enforces professional security headers (preventing clickjacking and cross-site scripting).
- Traefik forwards the request to your local physical machine at
https://10.1.1.3:8006behind the scenes!
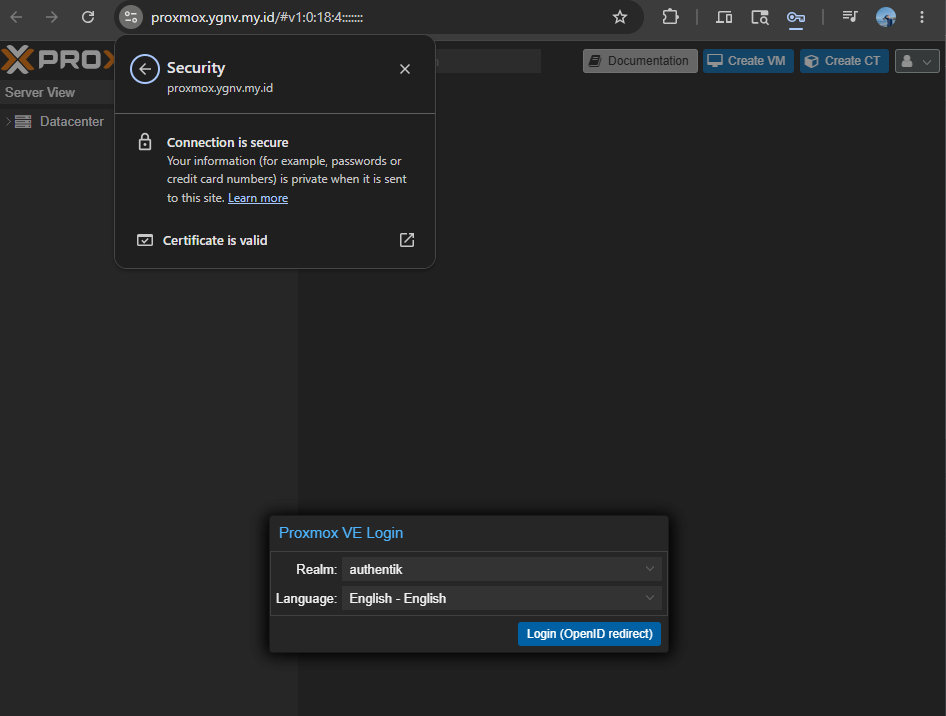
https://proxmox.ygnv.my.id with zero self-signed browser certificate warnings.Conclusion
By coupling MetalLB, Traefik, and cert-manager, we successfully brought cloud-native networking convenience to our bare-metal Kubernetes homelab.
We managed to:
- Dynamically allocate local subnet IPs (
10.1.1.52 - 10.1.1.59) without cloud load balancers. - Enable IP Address Sharing to run Valkey and Traefik on the exact same load balancer IP (
10.1.1.55). - Generate valid Let's Encrypt certificates for private intranet hosts via Cloudflare DNS-01 challenges.
- Simplify routing configurations using a default
TLSStorewildcard provider. - Expose external homelab services like Proxmox VE under the same routing and security umbrella.
This framework gives you a rock-solid, production-grade network edge that scales effortlessly with your local deployments.